

Updated on September 2026.
When I was a tiler, I used to write invoices on scraps of paper and hand them over at the end of a job. Half the time I’d forget to include a total, the other half I’d leave off my bank details. Then I’d wonder why I wasn’t getting paid. Sound familiar?
Here’s the thing: knowing how to make an invoice properly is one of the most practical skills any small business owner or freelancer can have. Not because it’s complicated, but because getting it wrong costs you real money. According to QuickBooks’ 2025 US Small Business Late Payments Report, over half of small businesses are carrying unpaid invoices averaging $17,500 in outstanding payments. That’s not a cash flow inconvenience, that’s a crisis.
Unprofessional or incomplete invoices are one of the biggest reasons payments get delayed. Missing information, wrong totals, unclear payment terms, these are all avoidable problems.
This guide walks you through how to make an invoice from scratch, what to include for legal compliance, how to customize, send, and track invoices, and how to set up automation so you spend less time chasing payments and more time doing the work.
What is an invoice and why do you need one?
An invoice is a formal request for payment. You send it to a client or customer after delivering a product or service, and it tells them exactly what they owe, why they owe it, and when they need to pay. If you’re in business and you’re not using proper invoices, you’re making it harder to get paid and harder to keep your finances organized.
Difference between invoices, receipts, and quotes
These three documents get mixed up constantly, so here’s a quick breakdown:
- An invoice is sent before payment is received. It requests money owed.
- A receipt is issued after payment is made. It shows the transaction is complete.
- A quote (or estimate) is sent before work begins. It outlines the expected cost.
Each document has a different job. Sending the wrong one at the wrong time creates confusion and delays.
The importance of professional invoicing for small businesses and freelancers
A professional invoice signals to clients that you run a serious operation. It reduces back-and-forth questions about what’s owed, speeds up approval from accounts payable departments, and gives you a record you can rely on if a payment dispute ever comes up. The QuickBooks report above makes it clear: sloppy invoicing isn’t just an admin problem. It directly hits your cash flow.
How do you make an invoice? Step-by-step guide
Making an invoice is straightforward once you know what goes in it and in what order. The fastest path is to use an invoice template or a free invoice generator so you’re not starting from a blank page every time. Here’s how to do it.
1. Choose the right invoice template or tool
Start with a template designed for invoicing, not a generic word processor document. A good template already has the right fields laid out, so you just fill in the details. You can find ready-to-use invoice templates or use a free invoice generator that lets you create invoices online without needing design skills. Look for a tool that saves your client and item details so you’re not re-entering everything each time.
2. Fill out the core invoice components
According to Billdu’s guide on the essential elements of an invoice, a solid invoice includes the core details your client and their accounts team need to pay it without back-and-forth. Here’s what to fill in:
- Your business name, address, and contact details (seller information)
- Client’s name, business name, and address (buyer information)
- A unique invoice number for tracking and reference
- Invoice date (when the invoice was created)
- Payment due date (when you expect to be paid)
- An itemized list of products or services, with quantity, unit price, and description for each line
- Subtotal before taxes or discounts
- Tax amounts, itemized clearly
- Total amount due
- Your payment details, so the client knows how to pay you
Every one of these fields matters. Leave one out and you’re inviting a delay. For more guidance on putting this together, see how to create invoice with all the right components in place.
One practical shortcut worth knowing: if you’ve already sent a quote or estimate, you can convert it directly to an invoice in one tap with the right tool, no re-entering needed.
3. Calculate taxes, discounts, and totals accurately
This is where a lot of people make errors that slow down payment. Here’s a simple process:
- Add up all line items to get your subtotal.
- Apply any discounts to the subtotal (fixed amount or percentage).
- Calculate tax on the discounted subtotal, not on the original amount.
- Add tax to the discounted subtotal to get your total due.
Keep your tax rate consistent and label it clearly on every invoice, for example “Sales Tax (8.5%): $42.50.” Clients and their accountants need to see this clearly for their own records.
4. Add payment terms and notes
Payment terms tell the client when and how to pay. Common terms include:
- Net 7, Net 14, Net 30: payment due within that many days of the invoice date
- Due on receipt: payment expected immediately
- 2/10 Net 30: a 2% discount if paid within 10 days, otherwise full amount due in 30
Add your accepted payment methods (bank transfer, card, etc.) and any late fee policy in the notes section. Be direct. “Payment due within 14 days. A 1.5% late fee applies after that date.” is a perfectly professional statement.
Invoice processing times in accounts payable teams average 9.2 days per invoice, per GEP. Set due dates with that in mind so you’re not chasing payments still sitting in an approval queue.
What must an invoice include to be legally valid?
A legally valid invoice needs more than just a total and a bank account number. The exact requirements vary by country, but there are core elements that apply almost universally, and if you’re working internationally or dealing with VAT-registered clients, you need to pay attention to the specifics.
Must-have elements for legal compliance
At a minimum, a legally compliant invoice should include:
- Your full legal name or registered business name
- Your business address
- A unique invoice number (sequential numbering is standard practice)
- The invoice date and payment due date
- The buyer’s name and address
- A description of goods or services supplied
- The quantity and unit price for each line item
- The total amount due, in the currency you’re billing in
- Your applicable tax rate and the tax amount charged
These are the baseline in most places. Billdu’s breakdown of the essential elements of an invoice backs this up across most markets.
Country-specific invoicing requirements: VAT, tax IDs, and digital signatures
Requirements get more specific depending on where you or your client is based:
- United States: no federal VAT, but sales tax rules vary by state. Include your relevant tax registration number if applicable.
- European Union: VAT-registered businesses must include their VAT number, the buyer’s VAT number for B2B transactions, the VAT rate applied, and a breakdown of VAT amount per line.
- United Kingdom: VAT invoices require your VAT registration number and a clear breakdown of VAT at each rate charged.
- Australia: GST-registered businesses issuing tax invoices over $1,000 AUD must include the buyer’s ABN and a statement that GST is included.
- Canada: GST/HST registrants must include their registration number and the applicable rate.
Digital signatures are increasingly accepted and sometimes required in markets like the EU and parts of Latin America for e-invoices. If you’re invoicing internationally, check the specific rules for your destination country rather than assuming your home-country format will be accepted.
Tips for international invoicing and multi-currency considerations
When billing clients in other countries:
- State the currency clearly on the invoice (for example, “USD $2,500” not just “$2,500”).
- Agree on the currency before you start the work, not after, so there are no disputes when exchange rates shift.
- Include your SWIFT/BIC and IBAN if accepting international bank transfers.
- Apply the correct tax treatment for cross-border services, which in many countries means zero-rated or exempt, but check this with a local tax professional.
- Keep records of the exchange rate used on the invoice date if you’re converting totals for your own books.
How can you customize your invoice to reflect your brand?
Yes, invoices can and should reflect your brand. A plain, unbranded document can look like it came from anywhere. A well-designed invoice with your logo, your colors, and a consistent layout tells a client they’re dealing with a professional. It’s a small thing that adds up to a better impression over time.
Adding logos, colors, and personalized messages
At a minimum, add:
- Your business logo at the top
- Your brand colors in the header or accent areas
- A short, personalized thank-you note or message in the notes field, something like “Thanks for your business, we appreciate it.”
Keep it clean. The goal is professional clarity, not a design showcase. The invoice still needs to be easy to read at a glance.
Using downloadable and editable invoice templates
A good invoice template saves you time and keeps things consistent. Look for templates that:
- Are editable in a format you’re comfortable with
- Have clearly labeled fields for all the required information
- Can be downloaded as a PDF for sending
Templates also help when you work across different types of jobs or clients. You can keep a base template and adjust the line items, terms, or notes for each scenario without rebuilding the whole document.
Best design practices for professional clarity and branding
A few practical rules for invoice design:
- Use one font throughout, something readable like Arial or Georgia
- Keep your logo and business name prominent at the top
- Group related information together: your details on one side, client details on the other
- Make the total amount due the most visually prominent number on the page
- Include clear labels on every field so nothing is ambiguous
- Save your logo, default tax rates, and standard payment terms so you’re not re-entering them on every invoice
The more consistent your invoices look, the more professional your business appears, and the faster clients can find the information they need to pay you.
How do you send and share invoices effectively?
Getting the invoice right is only half the job. How and when you send it matters just as much. A perfect invoice that sits in your drafts folder for three days after a job is finished is still costing you money.
Sending invoices by email vs. print
Email is the standard for most small businesses and freelancers today. It’s faster, easier to track, and gives both parties a written record. Print still has its place for some industries and clients, particularly where paper documentation is expected or required, but it’s slower and harder to follow up on.
When sending by email:
- Use a clear subject line: “Invoice #1042 from [Your Business Name], due [Date]”
- Keep the email body short: one or two sentences stating what the invoice is for
- Attach the invoice as a PDF, not an editable file
For more detail, see how to send invoices. It covers the full range of sending methods.
Sharing invoices as PDFs, payment links, and enabling e-signatures
Modern invoicing goes beyond attaching a PDF. Options worth using:
- PDF attachments: universally accepted, easy to print or file
- Payment links: let clients pay directly from the invoice without needing to transfer funds manually, which speeds up collection significantly
- E-signatures: useful for invoices that double as formal agreements, for example milestone-based project billing
If your invoicing tool supports online payment directly from the invoice, enable it. The fewer steps between the client receiving the invoice and completing the payment, the faster you get paid.
Timing your invoice delivery and follow-up scheduling
Send the invoice as soon as the work is done or the product is delivered. Don’t batch invoices once a week if you can avoid it. Every day you wait is a day added to your payment timeline.
Set a follow-up schedule before you even hit send:
- A reminder 3 days before the due date
- A follow-up the day after the due date if unpaid
- A firmer note 7 days overdue with a reference to your late fee policy
Consistent follow-up is not aggressive, it’s professional. It tells clients you’re organized and that your payment terms are real.
How can you avoid common invoicing mistakes?
A large share of late payments trace back to invoice errors, not clients who refuse to pay. According to Clockify’s research on late invoice payments among freelancers, 85% of freelancers experience late payments at least occasionally, and many of those delays are preventable. The most common cause? Invoices that are missing information or contain errors that trigger an approval hold or a back-and-forth with the client.
Typical errors to watch for
The mistakes that come up most often:
- Missing or incorrect invoice number (makes it hard for client systems to process)
- No payment due date specified
- Wrong total due to a calculation error or incorrect tax rate
- Missing payment details (no bank account, no payment link)
- Sending the invoice to the wrong person (not the one who approves payments)
- Descriptions that are too vague (“consulting services” instead of “10 hours of website consulting at $75/hr”)
- Incorrect client name or address, which can hold up approval in larger organizations
For a full rundown of what to watch for and how to fix each one, see how to avoid common invoicing mistakes. Worth bookmarking.
Reviewing and proofreading invoices before sending
Build a quick checklist habit before every send. Run through these in under 60 seconds:
- Is the invoice number correct and unique?
- Are the client’s name and address accurate?
- Are all line items described clearly with correct quantities and prices?
- Is the tax calculation correct?
- Is the total amount right?
- Is the payment due date included?
- Are your payment details or a payment link included?
- Is the invoice going to the right person or email address?
It takes less than a minute and saves hours of back-and-forth.
Correcting mistakes after invoice distribution
If you send an invoice with an error:
- Issue a corrected invoice with the same invoice number and a clear note: “Amended invoice, replaces original dated [date].”
- Notify the client by email pointing out exactly what changed and why.
- Ask them to discard or void the original.
- Keep both versions in your records.
Don’t just resend without explanation. Clients and their finance teams need to reconcile documents, and an unexplained duplicate invoice creates more confusion, not less.
How can you track and manage your invoices efficiently?
Once invoices are out the door, you need a system to know what’s been paid, what’s pending, and what’s overdue. Managing this in a spreadsheet or from memory is a recipe for missed payments. Old National Bank’s research on managing overdue invoices found that 64% of small businesses have invoices that are overdue by 90 days or more. That figure points to a tracking problem, not just the occasional difficult client.
Using invoicing software or apps for real-time status tracking
Invoicing software fixes this. A good tool shows you, at a glance:
- Which invoices have been sent
- Which have been opened by the client
- Which are due soon
- Which are overdue and by how many days
- Which have been paid and when
This kind of dashboard view lets you prioritize follow-ups and spot problems early. Pair your invoicing records with how to track expenses for small businesses to get a fuller picture of your cash position at any given time.
Setting up automatic payment reminders
Manual follow-up is better than nothing, but automating reminders is more reliable. Set up:
- A pre-due reminder (3 to 5 days before the due date)
- An on-due notification (the day payment is due)
- An overdue reminder (24 to 48 hours after the due date, then weekly until paid)
Keep the tone of automated reminders professional and factual. Something like: “This is a friendly reminder that Invoice #1042 for $850 is due on [date]. Please let us know if you have any questions.” It doesn’t need to be awkward.
Handling overdue invoices and partial payments
When an invoice goes overdue:
- Follow up immediately, don’t wait to see if it resolves itself
- Make it easy for the client to pay by including a direct payment link in your reminder
- If partial payment is offered, decide in advance whether you’ll accept it, and if so, update the invoice to reflect what’s been paid and what’s still outstanding
- Document every communication in case a dispute escalates
If an invoice hits 60 or 90 days with no payment and no response, it may be time to consider escalation options, such as a formal demand letter or a collections process. That’s a business decision based on the relationship and the amount involved.
How do automated and recurring invoices save time?
For any client you bill regularly, setting up recurring invoices is one of the simplest time-saving moves you can make. Instead of recreating the same invoice every week or month, you set it up once and the system handles it from there.
Benefits of invoice automation for freelancers and small businesses
Recurring invoices and automation:
- Remove the risk of forgetting to invoice a regular client
- Cut the time spent on admin for ongoing contracts
- Create a predictable billing rhythm that clients come to expect
- Reduce errors from manual re-entry each cycle
- Free up time you’d otherwise spend on repetitive data entry
For anyone with retainer clients, subscription-style work, or regular maintenance contracts, automation is not a nice-to-have. It’s a practical necessity.
How to set up recurring invoices
The setup process is straightforward in most invoicing tools:
- Create the invoice with your standard line items, tax rates, and payment terms.
- Select a recurring frequency: weekly, fortnightly, monthly, or a custom interval.
- Set a start date and, if applicable, an end date or total number of cycles.
- Choose whether to send automatically or queue for your review before sending.
- Save it and let the system handle the rest.
For a step-by-step walkthrough of this process, how to set up a recurring invoice in the Bookipi mobile app takes you through each stage on mobile.
Integration with payment methods for ease of collection
Recurring invoices work best when they’re paired with a payment option that makes it easy for clients to pay each time. Options include:
- Card payment links embedded in each invoice so the client can pay in a few clicks
- In-person card payment using Tap to Pay for clients you see regularly
- Saved payment preferences so repeat clients don’t need to re-enter their details each cycle
The shorter the path between the client receiving a recurring invoice and completing payment, the less friction in the process and the faster the cash arrives.
How does Bookipi Invoice help you create and get paid on invoices?
Bookipi Invoice is built around one goal: making it fast and simple for small businesses and freelancers to create professional invoices, get them out the door, and get paid. Here’s what it actually does.
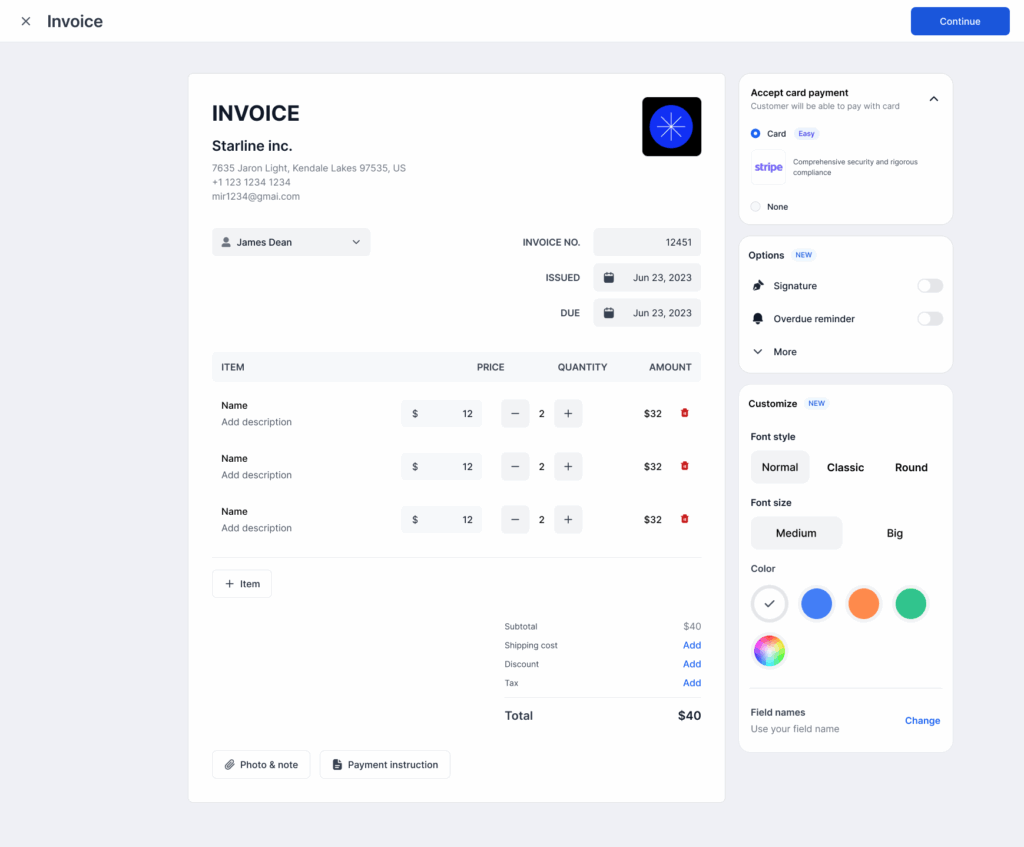
Create and send professional invoices in under a minute on mobile or web
From the iOS or Android app or the web app, you can create and send a professional invoice in under a minute. Save your clients and items so you’re not re-entering them each time, build estimates and convert them to an invoice in seconds, and add your default tax rates and terms so they apply automatically. All data syncs across your devices via the cloud, so you can start an invoice on your phone at a job site and finish it on your laptop.
Accept payments by card and in person with Tap to Pay
Bookipi Invoice lets you accept card payments powered by Stripe directly from the invoice, and take in-person payments with Tap to Pay. You get real-time notifications when a client opens the invoice, when it’s due, and when it’s paid, so you’re never guessing about the status of money owed to you. Clients receive an instant receipt when payment comes through.
Create recurring invoices, automatic reminders, and track statuses on a dashboard
Set up recurring invoices for repeat clients so billing runs automatically on schedule. Automatic reminders go out for upcoming and overdue invoices without you needing to manually follow up every time. Every invoice is tracked from sent to paid, and you can see all outstanding invoices and due dates at a glance on the dashboard.
Build estimates, apply tax rates, and generate invoice reports for tax prep
Add tax rates to individual invoices or set a default for all future invoices. Build quotes, convert them to invoices in seconds, and generate simple invoice reports for income reconciliation at tax time. Bookipi Invoice isn’t a full accounting ledger: it’s the fast accounts-receivable layer (create, send, track, get paid) that keeps your income records clean for whoever does your books. The free tier lets you send up to 3 documents every 30 days, with secure cloud storage, two-factor authentication, and ISO certification.
Download the app or start for free at bookipi.com/invoice-app.
What are the best invoice templates for different industries?
There’s no single invoice template that works perfectly for every type of business. The right starting point depends on what you sell, how you price it, and what your clients expect to see.
Templates for freelancers and consultants
Freelancers and consultants typically bill for time, deliverables, or both. A good template for this type of work includes:
- A clear description of each deliverable or service rendered
- Hours worked and hourly rate (if billing by time)
- Project name or reference number for the client’s records
- Milestone breakdowns if it’s a phased project
- Payment terms that reflect your agreed schedule (for example, 50% upfront, 50% on completion)
Templates for retail and product sales
Product-based businesses need templates that handle:
- SKU or product codes
- Quantity and unit price per item
- Applicable sales tax by item or category
- Shipping charges as a separate line item
- Returns or credit note references if applicable
A clean, itemized layout matters here because clients may be reconciling the invoice against a purchase order.
Templates for service providers and contractors
Tradespeople, cleaners, landscapers, and other service providers need templates that cover:
- A description of work completed (not just “services rendered”)
- Labor and materials as separate line items
- Any site or job reference number
- Subcontractor costs if applicable
- Variations from the original quote, clearly labeled
This is especially worth getting right because service-based disputes often come down to whether the invoice clearly reflects what was agreed.
How to select the right invoice template for your business needs
Ask yourself:
- Do I bill for time, products, or a mix of both?
- Do my clients need a purchase order number on the invoice?
- Do I need to show labor and materials separately?
- Do I work with international clients who need currency or VAT details?
Start with a blank invoice template that matches your primary billing model, then adjust the line items, labels, and notes fields to match your specific business. The goal is a template you can reuse with minimal editing each time, not one you rebuild from scratch for every client.
Bookipi Invoice streamlines your invoice workflow
Making a proper invoice isn’t complicated, but it does require getting the right details in the right place, every time. This guide covered the core steps: what an invoice is, what must go in it, how to comply with legal requirements in different markets, how to customize it for your brand, when and how to send it, what mistakes to avoid, and how to track and automate the whole process.
The common thread across all of it is that professional, accurate, and timely invoicing directly reduces payment delays and keeps your cash flow predictable.
If you want a faster way to put all of this into practice, Bookipi Invoice gives you everything you need to create and send a professional invoice in under a minute, accept card and in-person payments, set up recurring billing, automate reminders, and track every invoice from sent to paid, on your phone or on the web.
Download the app or start for free and invoice anywhere, get paid everywhere.